


Vertical Garden
by Bosc dAnjou

Vertical gardens or (if you prefer more sophisticated terms) "vertical vegetated complex walls" are recently being rediscovered. It you think about all the possibilities of their use, it's not surprising. They can improve air quality, purify polluted water, and reduce temperatures of a building during the day by absorbing sunlight. Several researchers are currently trying to prove these qualities. The idea to write this article crossed my mind when I was helping my friend with her own vertical garden a few weeks ago. I was surprised by how easy it was.
Why You Should and How You Can Build Your Own Wall Garden
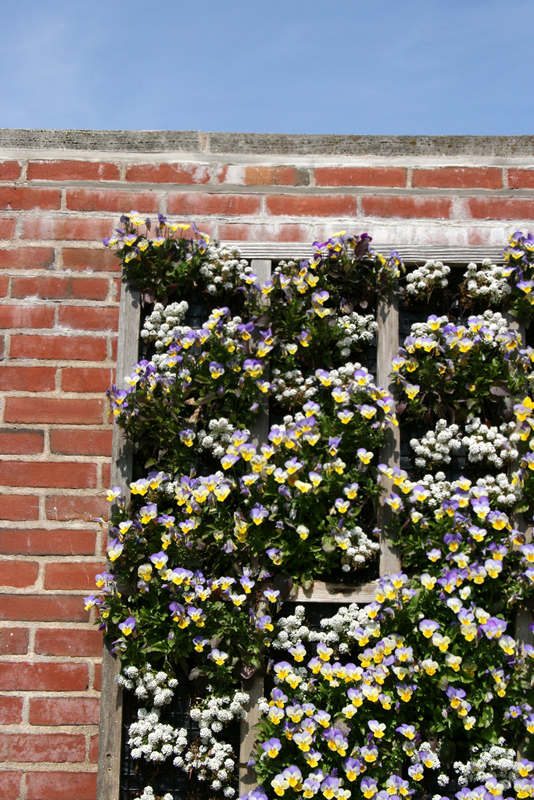
The first reason is that it can look great. Your first creation probably won't be as beautiful and balanced as the wall in the picture, but that shouldn't scare you off. The other reason is the fun you'll have during the construction part and the relaxation you can enjoy watering and caring for the plants. The wall can somehow magically improve the atmosphere in a room and thus can be your small stress-free hiding place. I know that this sounds a little bit new age, but believe me, you will feel better. Another reason for building your own vertical garden is that it enables you to grow your own vegetables. You can grow it as greenly as possible. Last but not least, it's fun to construct it.
How You Should Start
First, take a look around. Where do you want to install your living wall and how large will it be? Secondly you should ask yourself which plants you would like and can grow. If you want it to be located outside, choosing a tropical fruit or orchids for the Canadian climate wouldn't be the best option. Will the wall be exposed to the wind? Be sure that it will have enough light and a suitable climate. Then you should carefully plan which plants you want to grow. You will have to adjust construction of the garden and choose the type of soil accordingly. Suitable plants are cotoneaster, sweet pea, wisteria, and climbing hydrangea. If you're not sure about your gardening skills, succulents may be a good choice.
Vertical Garden by Quinn
Dombrowski
The BBC published an interesting article about vertical gardening, where you can find tips for species that should survive also harsher conditions. I think that shop assistants in every quality flower shop will be able to recommend plenty of options. The other option is to plant fruit or vegetables. Especially peas and cucumbers are very suitable for vertical gardening. My friend chose different kinds of herbs. She cooks a lot and above all she loves Italian cuisine. Therefore she always needs a good reserve of basil and rosemary. And mint comes in handy if you throw a party and you want to serve mojitos, or if you just want to prepare mint tea in the winter. If you want to know more about growing vegetables in your vertical garden, you should read the article from Dr. Perry, who is an adjunct professor at the University of Vermont.
If you're sure about species of plants you want to grow, you need to get material for the garden. For the construction, you will need:
- Classical wooden pallet â the one we used was 25 Ã 38 inches
- Potting soil (2.5 cubic feet for the 25 Ã 38 pallet is enough)
- Flowers or vegetables of your choice
- Roll of landscaping paper (you won't need the whole roll)
- Sandpaper
- Staples (and staple gun)
- Hammer
- Nails
HomeHardware Logo
As you can see, nothing special is needed. You can buy all the necessary materials in your local shop (e. g. HomeHardware). One more thing you may need is a bunch of wooden decks. They are not necessary, but depending on the pallet you get, you may need to cover some of the holes. Mine wasn't in perfect state so I had to fix some cracks and cover the gaps.
Instructions
- Your pallet will certainly have some rough spots. Before you start, you should sand them down. If the back of your pallet doesn't have much support (as I mentioned, the one that I used had big holes on the back), use wood plates (scrap wood is sufficient) about 5 inches wide and 1/4 inch thick (or the thickness of the rest of the supports) and cut it down to the width of your pallet. Nail them to the pallet to reinforce it.
- Now the worst part of the project: stapling the landscaping fabric to the pallet. To make it more durable, you can double or maybe even triple it up. Staple fabric along the back, bottom, and sides of the pallet, taking care at the corners to fold in the fabric so no soil will spill out. It will help you to have a good staple gun. Otherwise, after a few minutes, you will probably wish you had.
- This point depends on your choice. If you want, you can paint the front with any colour. It depends on the rest of the room where you want to put it. But even if you prefer its original colour, transparent paint will help to preserve the wood.
- Lay the pallet flat and pour potting soil through the holes. Press the soil down firmly, but leave enough room to begin planting the plants.
- Begin planting, starting at the bottom of the pallet and ending at the top. Make sure the soil is firmly packed in each layer as you move up. Add more soil if needed so that plants are tightly packed at the end.
- Do not set the vertical garden upright yet. You should leave it to be "horizontal garden" for a while. Water your wall garden thoroughly and let it remain horizontal for 1 to 2 weeks to allow plants to take root. After 1 to 2 weeks, you can set it upright. Now you just need to tidy up the mess (it almost took us longer to clean everything up than to construct the living wall).
One last remark: remember when you water to start at the top and water each subsequent section a little less, since the water will naturally seep through to the bottom-most plants.
Origins
Hanging Gardens of Babylon
by Wikimedia Commons

If you want to know more about the origins of vertical gardens, you may be surprised by how old they are. This concept was invented more than 2,500 years ago. Primacy belongs to the Hanging Gardens of Babylon. When we move to the recent history, we have to mention Stanley Hart White, who was a professor at University of Illinois around 1935. With his name is connected the first known patent for a vertical garden that he then called "Botanical Bricks." He conceptualized it as a solution to the problem of modern garden design. Although, as you can see, the concept itself is quite old, modern technologies such as hydroponics (which basically means growing plants without any soil, using just mineral nutrients, in water) enabled us to elevate vertical gardens to whole new level. You can even find a book written by Dr. Dickson Despommier, long-time professor of microbiology at Columbia University, about the future prospects of vertical farming.
ELT Living Walls
If you don't have the time or motivation to make your own vertical garden, it's possible to buy living wall kits in your local shop. One of the biggest producers in Canada is ELT Living Walls from Ontario. The price per one modular panel starts somewhere around $90 and you can order them online. But still, doing it on your own is much greater fun â especially if you're doing it with your friends â and a bottle of red wine helps too.
Especially if you do not have much space in your garden or if you live in an apartment, they can give you at least some contact with nature. With this guide you can now design and construct your own garden for a small fraction of the costs you would have to pay for the professional solution.